
Home roasting has changed dramatically since I began roasting coffee in the garage over 11 years ago. At that time, the equipment and techniques available to help you produce a great roast were limited. One of the few options for a home roaster at the time was a Hottop KN-8828B-2K drum roaster. It can roast batch sizes up to about 250g, is electric, and has a small footprint to fit nicely in the corner of your garage. Unlike many of the small toaster oven style or whirly-pop roasters, the Hottop allows you to eject the beans from the drum at the precise moment you wish for fast cooling. This is a critical step in the precarious art of baking a coffee bean.
Tip: Don’t try to roast indoors using this roaster. The smoke that comes from the roasting process is oily, and will stick on every bit of sheetrock, paint, fabric, your lungs, and other material that oil likes to ruin.
One downside is that this model does not have much intelligence to it. In the age of roasters with multiple thermal couples, PIDs, and connectivity to roasting software such as Artisan. This means that you must make your own adjustments. Hottop does provide some guidance on how to roast, and will trigger an alarm when the drum temperature is 160F to indicate it is ready, but it does not really align with modern techniques described in books like “Coffee Roasting Best Practices.” And for as convenient as electric is, it simply does not have the BTUs and control that a gas-powered unit has, so expectations should be adjusted a bit.
A simple recipe for roasting with the Hottop
The guidance below reflects what I have found that works well for my Hottop KN-8828B-2K roaster. Note that other Hottop models may have different heating element and capacity capabilities, so the guidance may not be applicable to other units. I have tried dozens of different recipes, manually tracking and logging the data to see what hits the marks that characterize a good roast. The recipe below attempts to balance the need for simplicity (for the beginner, or the lazy), and a great tasting cup of coffee.
Take these recommendations as general recommendations only. You will not necessarily be producing a roast that has an ideal declining Rate of Rise (RoR), nor will it necessarily hit the desired times for the roast phases or total roast time. The reasons for this include:
- It is electric. There are only so many BTUs you can derive from 120v AC. Electric roasters are slow to respond to desired changes in heat applied to the beans. Like a good gas grill, you have a much greater ability to adjust temperature with a burner that is fed by propane or natural gas which is why you tend to see smaller roasters in the 500g capacity range be powered by gas.
- Little thermal mass. Thermal mass can store thermal energy and help smooth out temperature changes. Temperature control is critical and influences the development of the coffee in the roasting process.
- This model only has a single thermal couple. Larger roasters tend to have two or more: One to monitor the drum environmental temperature, and another probe to measure the approximate temperature of the bean. More ways to measure give more sensory queues to understand the progress of the roast and adjust accordingly.
- Guidance that applies only to larger or commercial style roasters. Profile characteristics do not always scale down. And unlike other drum roasters, the perforated drum of this roaster changes roasting to be more convective, as opposed to conductive heating found with solid single wall or double wall drums. Convection is a faster way to transfer heat energy to the bean, which makes it difficult to directly translate established practices to this roaster.
Bean type and origin, batch size, ambient air temperature, flow of exhaust filter and voltage will also impact the results. For this example, I am using wet processed beans from Colombia, with a 250g batch size, and roasting them to Full City to Full City Plus+ (just before 2nd crack). This yields a roast that weighs in at about 212g, a 15% loss in weight. I use this recipe for pulling espresso in my ACS Vesuvius.
Tip: Roasting is influenced by your ambient temperature. If it has been cold out, bring your roaster inside and keep it warm until the moments before you begin planning on roasting outside. This will minimize the impact of cooler temperatures.
Step 1: Turn on and let it preheat to 345F.
Step 2: At 345F drop beans into drum (aka “charge”)
Step 3: At 310F. 50% Fan
Step 4: At 360F. 100% Fan
Step 5: At 370F. 80% Temp
Step 6: At 380F. 60% Temp. Note that at about 394F, the Hottop will shut off the fan. Quickly override this by simply pressing one of the “down” buttons on the control panel.
Step 7: At 392F. 40% Temp
Step 8: 404-406F. Eject beans. This moment can be adjusted based on the desired roast level of your beans. One begins to hear hints of a second crack at around 406-410F.
Tip: Remember to immediately pull the filter at the back of the roaster after the beans drop. This will improve the longevity of the filter by letting smoke exhaust out of the drum freely.
Since my model of the Hottop does not have any ability to connect to Artisan, my only way to track is manual. I track at 15 second intervals from charge to ejecting the beans.
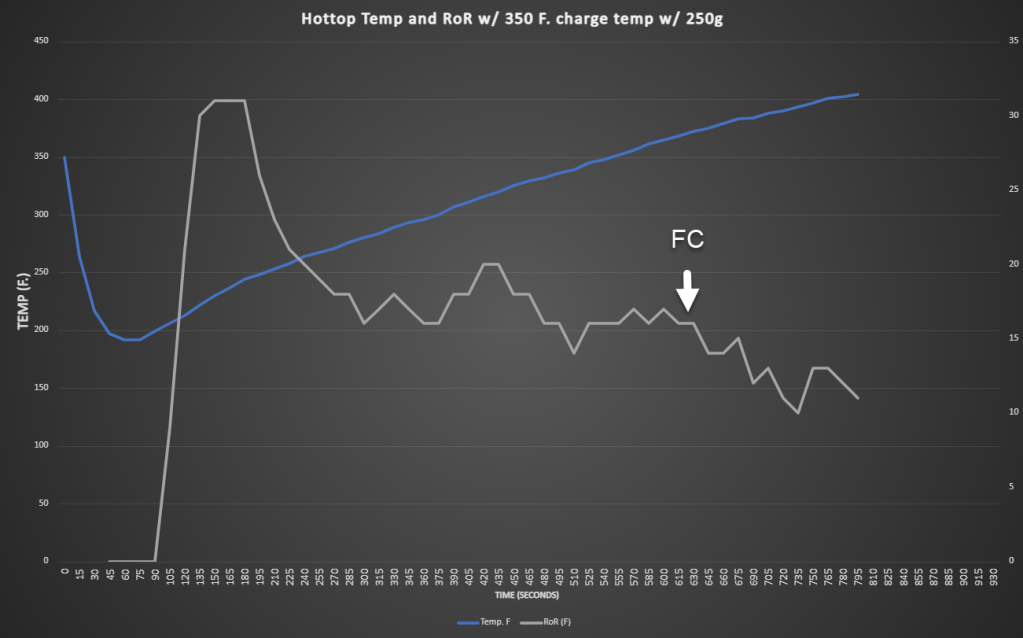
This graph tracks two types of information. 1.) The temperature of the bean/drum as stated by the thermocouple, and 2.) the RoR. Total roast time comes in at 13 minutes and 15 seconds. It is probably a little too long, but all that the Hottop can muster with a 250g batch size.
This recipe attempts to minimize the impact of the rise, crash, and flick in the RoR that typically occurs around and after the first crack, as the heat changes from endothermic to exothermic. Good roasting profiles try to minimize this, as a smooth declining RoR will yield the best tasting roasts, and prevent a baked taste. A smooth declining RoR is more difficult to do with this style of roaster.
Can you get the roast curve to look better? Probably. With time you can make the Hottop mirror some of the roast curves found in roasting books. However, with a small electric roaster, improving the roast curve complicates the procedure, which is antithetical to my objective of this recipe. And depending on preferences, the differences tasted in the cup may not warrant the additional complexity.
After roasting, I place them in an Airscape canister and let them degas for a few days, as they will be emitting a lot of CO2 gasses. I begin using them on day 3 if I plan well. If I do not plan well, I use them sooner.
Conclusion
While the roaster has been incredibly reliable, I have finally pulled the trigger and am moving to a roaster with more capabilities. Would I recommend the Hottop to an aspiring home roaster? Absolutely. It is a great starting point in the world of consumer coffee roasting and can produce some extraordinary roasts. Although, if you think you may want more capabilities, I might suggest the Hottop KN-8828B-2K+ that offers connectivity to Artisan.

How are you tracking the RoR in the hottop?
LikeLike
Since that model didn’t have any connectivity to metrics collection, I had to record it with my phone, and track the temp over time using a spreadsheet.
LikeLike